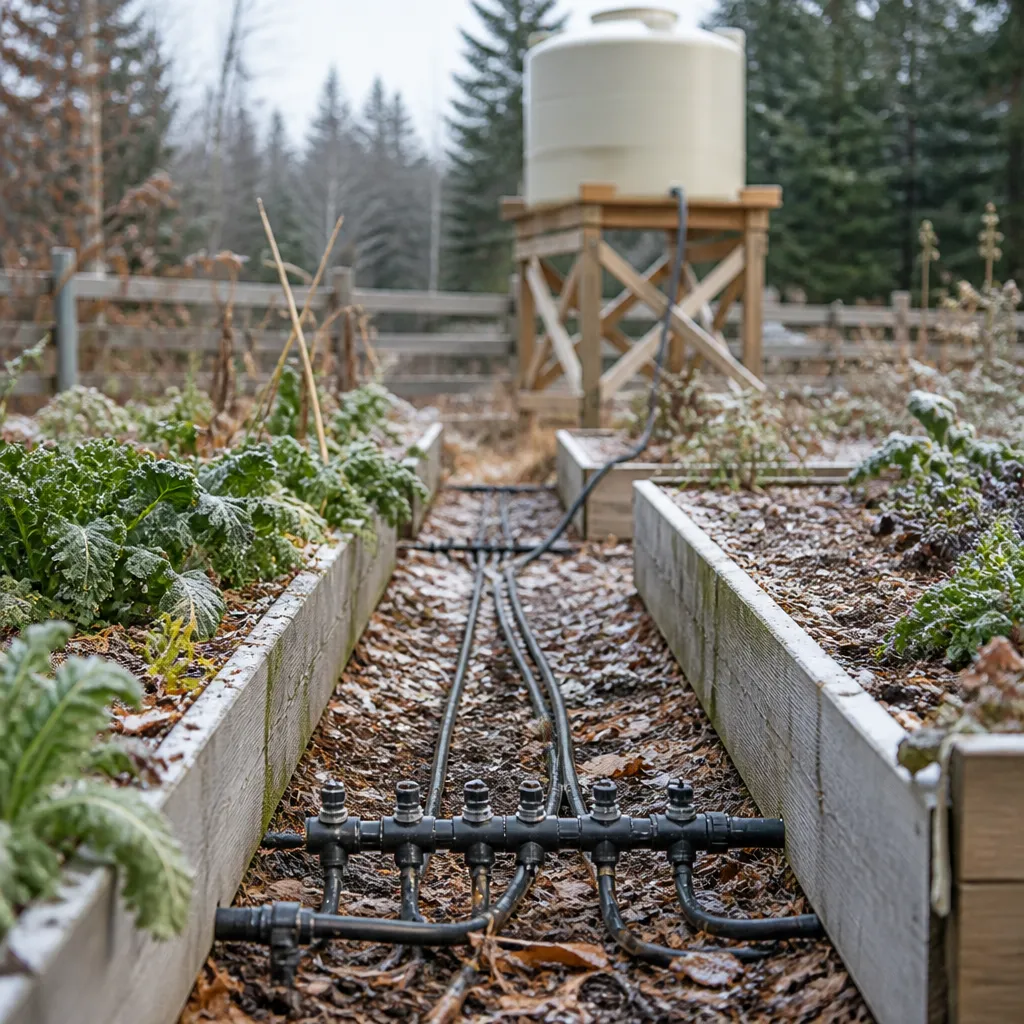
A gravity-fed drip line that looked empty in October can split by January, and the cause is almost always one low pocket of tubing that kept a few cups of water. If you want to winterize drip irrigation off-grid, the job is less about closing one valve and more about getting every foot of tubing, every filter, and every emitter empty before the first hard freeze. Gravity systems make this harder than pressurized setups because nothing pushes the water out for you, and you get no pressure gauge telling you the line is clear. What follows is the drainage routine we use, including where water hides, what to do first, and the shortcuts that cause the most damage.
Table of Contents
- Quick Takeaways
- Why Gravity-Fed Lines Hold Water
- Shutting Down the Supply
- Draining Low Points and Vents
- Blowing Out Lines with Compressed Air
- Choosing a Drainage Method
- Protecting Exposed Components from Frost
- Restarting in Spring
- Frequently Asked Questions
- References
Quick Takeaways
| Key Insight | Explanation |
|---|---|
| Shut the tank outlet before anything else | Closing bed valves does not stop water refilling the header from upstream. Only the source valve does. |
| Let gravity do the bulk of the work | Drain the line on its own slope first, then use air only to clear the residue left in dips and emitters. |
| Treat every dip as a water pocket | Sags between stakes trap water. Lift them, add a drain point, or accept a manual drain at each one. |
| Open end caps and vents | Without air entering at the top, water stays trapped in the tubing no matter how long you wait. |
| Keep compressor pressure low | Raise pressure only to clear a blockage you have located, never to force a stubborn line. |
| Insulate only what is already empty | Foam insulation around wet pipe holds the water in place and gives it a longer time to freeze. |
Why Gravity-Fed Lines Hold Water
Pressurized irrigation empties itself in a rush once the pump shuts off, but a gravity system has only the height of your tank to move water. When the supply stops, the water in the tubing drains back only as far as gravity allows, which leaves most of the line full in every dip and sag. That is the hidden problem: a drip line that looks level from the bed can hold a long stretch of standing water.

Drip tubing is thin walled and flexible, so it sags between stakes and forms U-shaped traps that hold water even when the header drains. Emitters are another trap. Each one holds a small drop inside its flow path, and those drops freeze and expand. Water expands about 9 percent as it turns to ice, so even a small trapped volume can split a fitting or crack a barb.
Expect the damage to show up in spring, not during the freeze. A joint that cracked in December often holds until the first pressure test, then leaks at the worst moment, when the beds need water. Treat every winter drain as a repair job you are postponing if you skip a step. The sections below cover the steps in order, starting with the supply.
Shutting Down the Supply
Every drainage routine starts with isolating the water source so nothing refills the line while you work. On a gravity system, that usually means closing the outlet valve at the storage tank or the isolation valve on the supply line, not just the valve at the bed. Rain Bird’s winterization guide puts shutting off the supply as step one, before any draining, and Texas A&M’s irrigation guidance advises turning off the supply at its isolation valve before winterizing. Both principles apply directly when your source is a tank.
Closing the Tank Outlet and Bleeding the Header
Close the tank outlet, then open the lowest drain or end cap on the header so you can confirm the supply has stopped. If water keeps coming out after the outlet is shut, you have a leaking valve or a second feed you forgot about, such as a hose connected to the header or a spigot left open. Fix that first. Otherwise you will drain the same water twice.
Flushing the Filter and Regulator
Filters hold sediment and water, and a screen filter that stays wet over winter can freeze and split its housing. Remove the screen, rinse it, and let it dry before storing it. Leave the filter body open at the bottom so water can run out. Pressure regulators and inline check valves need the same treatment, because a check valve can trap water above its seat for weeks.
Pro tip: Mark the position of your tank valve and filter with a piece of tape or a note on the handle. When you return in spring, you will know the supply stays off until you are ready for it.
Draining Low Points and Vents
Gravity drainage is only as good as the slope of the line, so start by walking the full run with the supply closed. Look for the places where tubing dips, where it crosses a path or a gravel strip, and where a riser lifts it back up. Each of those dips is a pocket. Sag between stakes is the most common one, and it is easy to miss when the bed is covered with mulch.

Finding the Low Points Before Frost Does
Walk the line in daylight with the water off and the beds open. Run a hand under the tubing at each stake and feel for a belly, then add a stake or relocate a bend to lift it if you can. Where you cannot lift it, add a drain point: a small tee with a short length of tubing and a cap or manual drain valve at the lowest spot.
Opening Ends, Vents, and Automatic Drain Valves
Open every end cap and emitter drop line so air can enter at the top while water leaves at the bottom. Without vents, the line can hold a partial vacuum and keep water trapped. Automatic drain valves, which open when pressure drops, can handle low points you cannot reach, but they need checking every fall because grit can hold them partly open or stuck shut.
Key insight: the line that freezes is rarely the one you drained first. It is the low spot you forgot to check.
Blowing Out Lines with Compressed Air
Gravity drainage removes most of the water, but the film and droplets left in the tubing need air to clear. A compressor blowout is the fastest way to push out the last of it, and it is the method most homesteaders reach for once they own a compressor. Used carefully, it works well. Used carelessly, it blows fittings off and sends tubing whipping around the yard.
Setting Up the Connection Safely
Connect the compressor to the header through a shutoff valve and a regulator, not directly to the tubing. Use a short air hose with a fitting rated for the pressure you plan to use. Keep people and pets away from the open end, and secure the tubing with stakes or weights so it cannot whip. Work from the header outward, one zone at a time.
Pressure, Sequencing, and When to Stop
Set the regulator low and bring it up slowly. Drip tubing and emitters are built for low water pressure, not blast pressure, and the pressure needed to clear a line is far below what a compressor tank can deliver. If you keep turning the regulator up, something is blocking the line: a closed valve, a kinked section, or a plugged emitter. Stop and find it, because more pressure will only split a joint.
Once a zone runs dry with a light mist at the open end, shut the air off, close the zone valve, and move to the next one. Do not blow the whole system in one pass. A leak in one zone will bleed pressure away from the others and make the rest hard to read.
Choosing a Drainage Method
Most off-grid systems do not need one method alone. The right mix depends on how much slope you have, how many zones you run, and whether you have a compressor you trust. Gravity drainage handles the bulk of the water, blowout clears the residue, and manual or automatic drain points cover the spots neither method reaches.

My rule of thumb: if you have no compressor, invest in drain points at every low spot and accept a bit more walking in the fall. If you do have a compressor, use gravity first and treat air as the finishing step. Going straight to air wastes time, because most of the water is already moving downhill and the compressor just pushes spray into the beds.
| Method | Best Use | Main Risk |
|---|---|---|
| Gravity drain only | Lines with steady slope and few sags | Leaves residual water in dips and emitters |
| Compressed-air blowout | Clearing residue after gravity drainage | Overpressure splits fittings and whips tubing |
| Manual or automatic drain points | Permanent low spots and remote beds | Grit can hold valves open or shut, so they need annual checks |
In practice, the combination that holds up best is gravity drainage plus permanent drain points at the three or four worst dips on each run, with a light air pass only where residue remains. Pick the method that matches your slope and your equipment, then check the result at the open ends before you call the zone done.
Protecting Exposed Components from Frost
Draining the tubing does nothing for the parts that stay full by design. Tanks, controllers, timers, pressure regulators, and any exposed riser can hold water or moisture that freezes. Blackburnflag’s winterization guide lists insulating exposed pipes as a standard step, and that advice carries over to off-grid drip systems with a few adjustments. Protect what you cannot drain, and move what you can store.
Tanks, Filters, and Controllers
Drain or lower the water level in any tank that sits in an exposed spot, and keep the lid vented so condensation does not build up. Bring battery-powered controllers indoors where you can, because batteries lose capacity in the cold and electronics crack when water gets inside. Store filter screens, regulators, and fittings in a dry shed rather than leaving them on a bench outside.
Insulation and Heat Tape Trade-offs
Foam pipe insulation over exposed risers helps, but it only buys time if the pipe is already empty. Insulation wrapped around wet pipe holds the water in place and still lets it freeze. Heat tape can save a riser during a hard cold snap, but it needs a reliable power source and creates a fire risk if left on an unattended run. On a solar or battery off-grid system, I would rather drain and insulate than depend on heat tape through a long cold spell.
Restarting in Spring
Spring startup is where winter damage shows up. Many homesteaders open the supply in April and watch the beds flood from a joint that cracked in December. A slow, staged restart catches those leaks before they cost you water or soil.
Checking for Cracks Before You Pressurize
Before you open the tank valve, walk the lines and check for cracked fittings, split tubing, and emitters that look chalky or swollen. Focus on the joints around tees and elbows and the first few feet after the filter, since those are the points where expanding ice does the most damage. Replace any cracked section now rather than patching it under pressure.
Flushing Debris Out of Emitters and Filters
Winter sediment and dead leaves settle in the low points and clog the first emitters on each run. Open the end caps and let the header run for a minute or two before you close them again, then clean the filter screen before it goes back on. Watch the first few emitters in each zone for even flow. If one is weak, it is probably blocked, and it is cheaper to fix now than during the first dry week of July.
Pro tip: Bring the first zone up alone and leave the rest closed. Watching one zone for ten minutes tells you more about a hidden leak than an hour of checking every bed at once.
Frequently Asked Questions
Can I leave my drip lines full over winter if I insulate them?
No. Insulation slows heat loss but does not stop freezing, and water trapped in tubing that drops below freezing will expand and split. Drain the lines and insulate only the parts you cannot drain.
Do I need an air compressor to winterize a gravity-fed system?
Not always. Gravity drainage plus open end caps and drain points clears many systems. A compressor helps with residue and long runs, but it should be used at low pressure and only after most of the water has drained.
When should I winterize drip irrigation off-grid?
Start before the first hard freeze, not after the first frost warning. The safe rule is to drain as soon as nighttime temperatures start dropping toward freezing, because a single hard overnight freeze is enough to crack a line that was not fully emptied.
Should I shut the water off at the tank or at the bed valves?
At the tank outlet or the supply isolation valve, every time. Closing individual bed valves leaves the header full and lets water flow back into the line from upstream, so the source must be shut first.
What do I do if a line freezes anyway?
Do not force water through it. Let the line thaw slowly, check the fittings and tubing for cracks, and replace any damaged section before you pressurize. Pressurizing a cracked line only moves the leak to a different spot.
Tell us in the comments which low spot on your gravity lines caused the most trouble, and what finally fixed it.
We would love your feedback and any insights you would share with others. What perspective would you add?
References
- Rain Bird’s step-by-step guide to shutting off, draining, and storing drip components
- Texas A&M School of Irrigation guidance on isolating the water supply before winterizing
- Ten-step irrigation winterization overview covering drain methods and pipe insulation
Leave a Reply